Adding or Editing a Scene
All diagrams or layouts are associated with a "scene" or event. Therefore, creating a new scene - or selecting an existing scene - is the first step to creating a new layout.
Important Note: If your Placez program is integrated with Caterease event planning program, your scene will be automatically created for you through the interface. See the Caterease help documentation for more information. If adding a new scene here in Placez, the only required information below is the "Scene Title" (Step 2) and "Place" (Step 12).
- Click or tap the New Scene button, located at the top right of any screen in Placez.
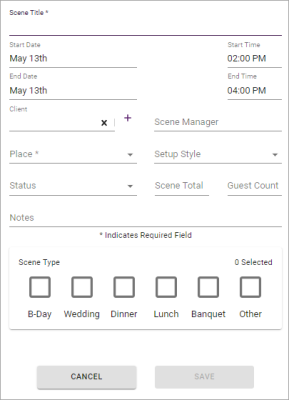
Result: You are taken to the New Scene window.
- Type the title of your new scene into the Scene Title field.
-
Click or tap in the Start Date field to access the pop-up calendar.
Note: The date fields do not accept keyboard input. -
Scroll through the calendar months using the left and right arrow buttons and select a date for the scene, then click away from the date field to set.
-
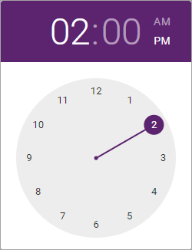
Click or tap in the Start Time field to view a pop-up clock.
Note: The time fields do not accept keyboard input.
-
Click/tap on the hour in which the event starts. For example, click "3" if the event starts at 3:00.
Result: The minutes field is now highlighted. -
Click/tap on the "minutes" in which the event starts. For example, click "30" if the event is to take place at 3:30.
Note: You can also drag the minutes indicator around the clock using your mouse. -
Click/tap AM or PM as appropriate, then click away from the time field to set.
-
Click/tap in the End Date and End Time fields and repeat Steps 3-8 as desired.
- Click/tap the Client field to choose from the list of recently-accessed customers, or begin typing the name of an existing client to scroll to a match. Click/tap the plus sign to the right of the field to add a new client.
Note: Click/tap the "X", located at the right of the Client field, to remove the existing client. If adding a new customer, click/tap the plus sign and complete the Client Information fields in the pop-up window. - [Optional] Type the name of the scene manager into the Scene Manager field.
Note: "Scene Manager" might refer to the sales representative, project manager, consultant, etc., for the current event/function. - Click/tap into the Place field to select a place from the existing list of options.
Note: This is a crucial step; a Place must be selected from your existing list. This list is dictated by the "places" that have been created in your Placez Library. See Adding a New Place . -
[Optional] Choose a Setup Style and Status for the scene by clicking the down arrow to the right of each field and selecting from the custom list of options.
Note: These pick lists can be customized in the Setup area of the program. See Managing Placez Picklist Items. -
[Optional] Type an Event Total and Guest Count into those respective fields.
-
[Optional] Type any event notes related to this scene into the Notes field.
- [Optional] Click/tap the relevant box or boxes under Scene Type to assign the scene-type tags to this scene.
Note: Assigning scene tags is beneficial when filtering your scenes by a particular detail. - [Optional] Click/tap the Modify Image button, located toward the lower right-hand side of the screen, to browse to a stored image to associate with your scene.
Note: Once you have created a layout for your scene, you can save an image of that layout as the cover image for the scene. - Click/tap the Save button, located toward the right-hand side of your screen, to save the new scene.
- Click or tap the Scenes option
 on the sidebar along the left side of your screen.
 - Locate the scene you would like to edit. See Finding an Existing Scene.
- Click/tap the Go To symbol
 , located on the right-hand side of the selected record. to open the scene.
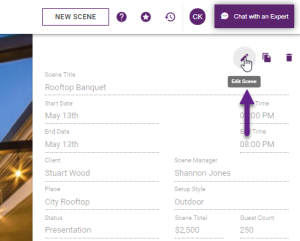
 - Click/tap the Edit Scene button
 , located on the upper right-hand side of your screen, to enable editing.

- Edit your scene details as desired by clicking/tapping into the fields and typing over the existing text or by choosing an alternative option from a custom picklist.
- To change the image, click/tap the Modify Image button, located toward the lower right-hand side of the screen, to browse to a stored image to associate with your scene.
Note: Once you have created a layout for your scene, you can save an image of that layout as the cover image for the scene. - Click/tap the Save button.
- Optionally add a scene layout to the scene by clicking/tapping the New Layout button at the bottom right. (See Designing a New Layout .)
- Optionally clone or delete an existing layout by clicking that corresponding button to the right of any layout listed at the bottom of the scene.
- Click or tap the Scenes option
 on the sidebar along the left side of your screen.
 - Locate the scene you would like to edit. See Finding an Existing Scene.
- Click/tap the Go To symbol
 , located on the right-hand side of the selected record.
 - Click/tap the Delete button
 , located on the upper right-hand side of your screen, to the right of the Clone Scene button.
Result: A confirmation prompt appears. - Read the pop-up message carefully and, when ready, click/tap Delete to delete the scene.
See Also: